Page 26 of 31 FirstFirst ... 162425262728 ... LastLast
Results 251 to 260 of 302

Thread: My first vehicle! 1956 CJ5

  1. #251
    Super Moderator bmorgil's Avatar
    Join Date
    Dec 2018
    Location
    Northwestern Ohio
    Posts
    3,617
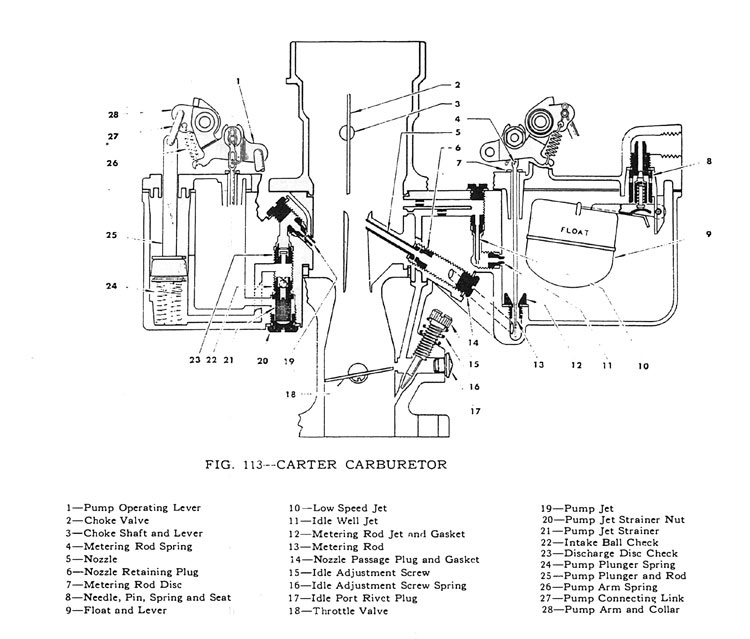
    One thing to remember to do when rebuilding these carbs. Be absolutely sure you push a very small wire through all the circuits Especially the individual Jets and Tubes. I have written before about the nozzles having corrosion in them even when brand new. It happened to mine, and I have seen it many times in old carbs. We have had a few members who have had it happen.The idle jet nozzle is very small and long. Really a bad idea when it comes to getting clogged. If the smallest piece of corrosion or dirt is in the idle nozzle (item 5), the engine will not idle without the choke on.

    This is a WO carb, but many carb's have a similar setup.


    This is a YF.

    Screenshot 2024-03-29 074237.jpg
    Last edited by bmorgil; 03-29-2024 at 06:56 AM.

  2. #252
    Super Moderator LarrBeard's Avatar
    Join Date
    Nov 2014
    Location
    Ft. Wayne, IN
    Posts
    2,501
    When I did a carburetor rebuild for the '48, I could not get the accelerator pump out of the cast body. Gunk and crud had glued it down!

    I had soaked it in several different potions to no avail and I finally took the heat gun I use to shrink electrical sleeving and heated the cast body (very carefully).

    Things stank and bubbled, but after a bit I was able to get the end of a pick under the pump and it came out. After that, it took a bit of cleaning and it went back together smoothly.

    Mrs. Google has a lot of "Rebuild Carter YF carburetor" information - Mike's Carburetor video (Four parts if I recall) is well done, thorough and easy to follow.

  3. #253
    Senior Member 56willys's Avatar
    Join Date
    Jan 2023
    Location
    Northwestern PA.
    Posts
    238
    Thank you for all the feedback! I followed Larry's advice and used a electric heat gun to heat up the carb. Just a little bit of heating and all the remaining parts came out with ease. I blew some air through all the passageways inside and they are all clear. I must say I am impressed by how many passageways and how small they are for machining in the 50s. I can imagine it being difficult to machine back then.

    So next I'll have to get it cleaned really well, and then start reassembly.

  4. #254
    Super Moderator bmorgil's Avatar
    Join Date
    Dec 2018
    Location
    Northwestern Ohio
    Posts
    3,617
    Whatever you do 56' as I said before, be sure to get some very small wire and push it through every passage you find. In addition make sure the jets and nozzles in the rebuild kit are also clear. It is Very common for the brass components in the rebuild kit to pick up green corrosion from just sitting on the shelf. Air wont always get it out. Sometimes it needs a little scratching. I have had to pull a few "freshly" rebuilt carbs back apart to clear "new" components.
    Last edited by bmorgil; 03-30-2024 at 05:30 PM.

  5. #255
    Senior Member 56willys's Avatar
    Join Date
    Jan 2023
    Location
    Northwestern PA.
    Posts
    238
    Quote Originally Posted by bmorgil View Post
    Whatever you do 56' as I said before, be sure to get some very small wire and push it through every passage you find. In addition make sure the jets and nozzles in the rebuild kit are also clear. It is Very common for the brass components in the rebuild kit to pick up green corrosion from just sitting on the shelf. Air wont always get it out. Sometimes it needs a little scratching. I have had to pull a few "freshly" rebuilt carbs back apart to clear "new" components.


    I will run some wire through the passageways, like always I appreciate the advice. I also just got an ultrasonic cleaner so I will put some parts in that for cleaning. And I'll run wire through to clean as well. I was just blowing air through as preliminary testing and to figure out where all the passageways connect.

    Question; the throttle plate has some surface rust on it. After cleaning the rust off, is there some sort of coating I should apply or will it be okay just bare? I mean it did take 60 years and who knows how much of that was sitting outside not getting used but I am just wondering if that rust would come back?

  6. #256
    Super Moderator bmorgil's Avatar
    Join Date
    Dec 2018
    Location
    Northwestern Ohio
    Posts
    3,617
    The throttle plate and choke plate will be just fine. Polish them up and make sure you run it from time to time and it wont rust again!

    The ultrasonic will do a nice job. That is what I use on my carburetors. I use hot water and the cleaning solution I have attached a link for. This is some good stuff. After an hour or so in the warm hot solution, It looks pretty good.

    https://www.aircraft-tool.com/detail?id=BRANSON-MC3&AspxAutoDetectCookieSupport=1

    Attached Images Attached Images
    Last edited by bmorgil; 03-31-2024 at 06:15 AM.

  7. #257
    Senior Member 56willys's Avatar
    Join Date
    Jan 2023
    Location
    Northwestern PA.
    Posts
    238
    Wow, amazing transformation on your carb! Mine was a lot cleaner than what you started with. The rest of the jeep around yours got polished too, which won't happen on Flossy for a long time!

    Thanks for the info on the throttle plate! I got it sanded and cleaned up. The choke plate I just roughly cleaned from the top since the screws did not want to unthread from the shaft. I don't want to risk stripping them.

    I've just been cleaning and cleaning. A few runs in the ultrasonic cleaner with a little dawn dish shop actually got it cleaned up pretty nicely. Then I did some hand cleaning, it's by no means perfect but it will get the job done.

    I got the master rebuild kit from KW. So next step is to start putting things back together. When I adjust the float, how much gap should it have? Some things I've seen say 3/8" but kaiser willys.com tech guide says for CJ5 it should be 5/16"

  8. #258
    Super Moderator bmorgil's Avatar
    Join Date
    Dec 2018
    Location
    Northwestern Ohio
    Posts
    3,617
    Dawn dish soap is magic. peeJ wishes she wasn't so clean, not allowed out of the garage on anything other than warm summer days!

    The screws treads in the throttle are brass and staked (smashed) in on the back. To remove them you file the backside of the threads off down to the throttle shaft and then unscrew them. If you tried that and they are stuck, you may have to use heat and quench it with some wax.

    I have always set the choke to level, and then I see how it runs. The problem is there are a couple different needle and seat assemblies out there originally, a few different fuel pumps and pressures being used, and the aftermarket also has a few different float assemblies. 5/16" from the bottom of the gasket to the top of the float, with the carb upside down and the weight of the float only, is the factory setting. There was also a float on the DJ and some others that was 9/32". You cant measure this close, the practice is to make or use a gauge. I hold the carb upside down and level the top of the float to the bottom of the carb top. That is an old "rule of thumb" when you don't have a gauge or, your not near the shop. It is almost always a good start. I have yet to have a carb not work for me with that as a preliminary and usually permanent, first adjustment. Some carb and vehicle combinations are very fussy about the final float level. I have found so far, the Carter's on the 134's are not real fussy. If you have the 2.5 lbs float and a 4 psi fuel pump, you may have to set the float a bit lower, or regulate the pressure with a fuel pump spacer.
    Last edited by bmorgil; 04-04-2024 at 06:19 AM.

  9. #259
    Super Moderator gmwillys's Avatar
    Join Date
    Aug 2017
    Location
    Alabama
    Posts
    3,622
    That's why our Heep will stay in the raw. Rain is no problem, just buff it down a couple of times a year to get the sheet metal shine to come back. The engine bay is crusty with mud stains now, but we have fun bush whacking in it. PeeJ is an extraordinary example of what a better than new Jeep can be, and I would love to have one that clean to put next to the Heep, but if I where have to choose, I'll take the Heep for a daily parts/grocery runner.

  10. #260
    Super Moderator bmorgil's Avatar
    Join Date
    Dec 2018
    Location
    Northwestern Ohio
    Posts
    3,617
    I had an awesome ride in the Heep gm! I can honestly say off roading in a vintage 6 volt CJ, no top no doors, standing up hanging on to the windshield, is an experience worth repeating, many times. However, my "vintage back" taught me to enjoy a smooth 5 mph roll in the parade lines. I love em all, even if they aren't running.

Posting Permissions

  • You may not post new threads
  • You may not post replies
  • You may not post attachments
  • You may not edit your posts
  •